> ## Documentation Index
> Fetch the complete documentation index at: https://docs.thanx.com/llms.txt
> Use this file to discover all available pages before exploring further.
# Azure Blob Storage
> Configuring your Azure Blob Storage destination.
## Step 1: Create Azure storage account
1. In the Azure portal, navigate to the **Storage accounts** service and click **+ Create**.
2. In the "Basics" tab of the "Create a storage account" form, fill in the required details.
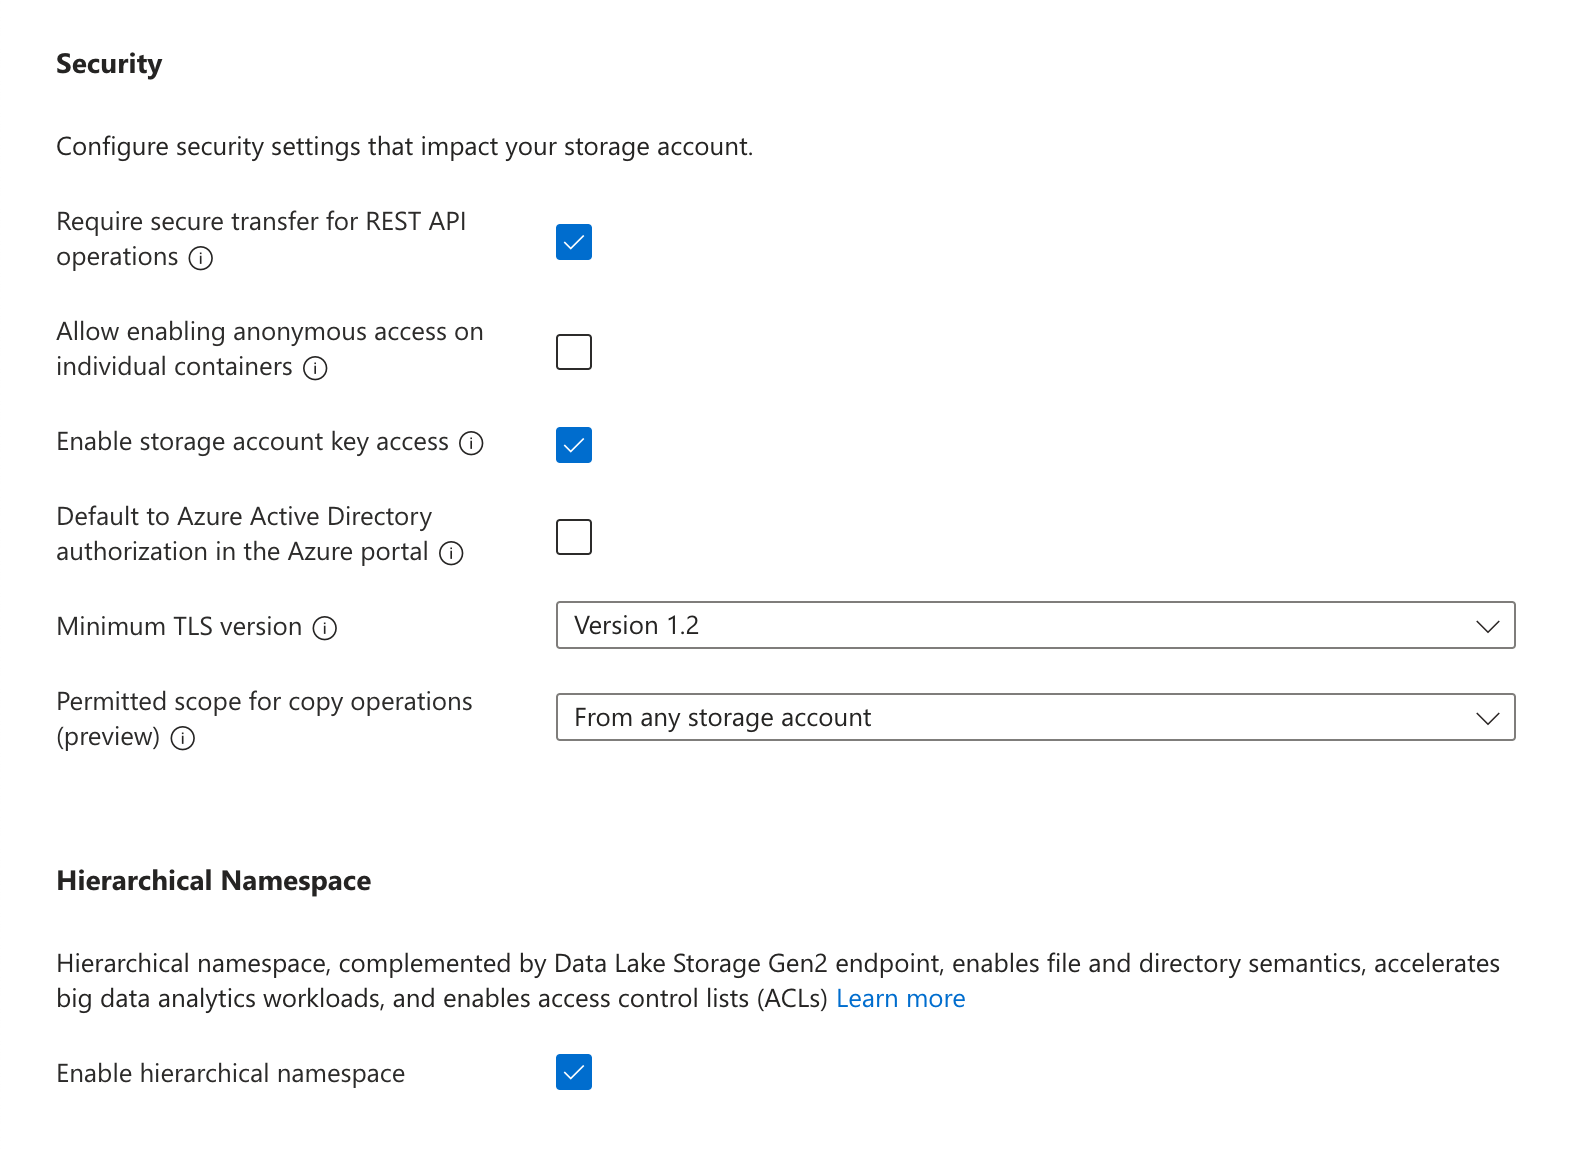
3. In the "Advanced" settings, under "Security" make sure **Enable storage account key access** is turned on. You may turn off (deselect) "Allow enabling public access on containers". Under "Data Lake Storage Gen2", select **Enable hierarchical namespace**.
 4. In the "Networking" settings, you may limit "Network access" to either **Enable public access from all networks** or **Enable public access from selected virtual networks and IP addresses**. If the latter is selected, be sure to add the service's static IP to the address range of the chosen virtual network. All other settings can use the default selections.
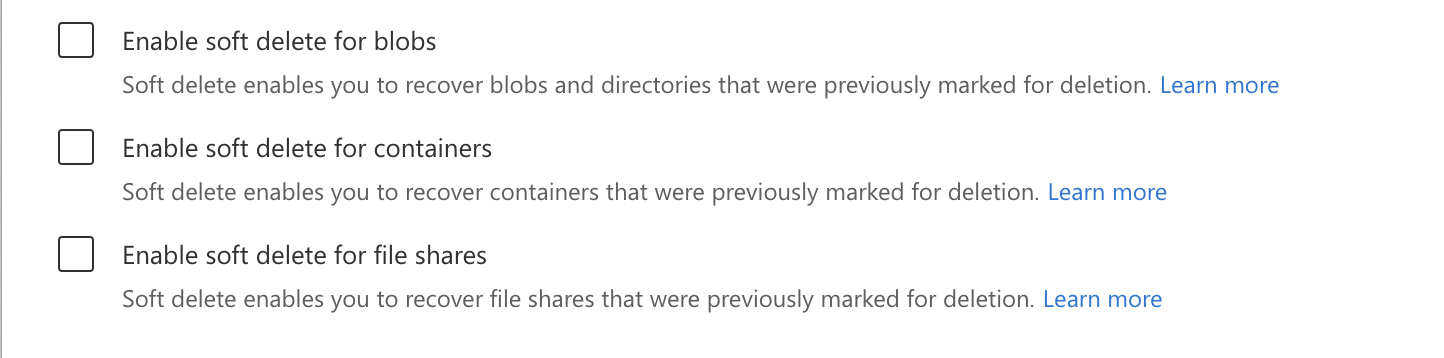
5. In the "Data protection" settings, you must turn off **Enable soft delete for blobs**, **Enable soft delete for containers**, and **Enable soft delete for file shares**.
4. In the "Networking" settings, you may limit "Network access" to either **Enable public access from all networks** or **Enable public access from selected virtual networks and IP addresses**. If the latter is selected, be sure to add the service's static IP to the address range of the chosen virtual network. All other settings can use the default selections.
5. In the "Data protection" settings, you must turn off **Enable soft delete for blobs**, **Enable soft delete for containers**, and **Enable soft delete for file shares**.
 6. Once the remaining options have been configured to your preference, click **Create**.
## Step 2: Create container and access token
1. In the Azure portal, navigate to the **Storage accounts** service and click on the account that was created in the previous step.
2. In the navigation pane, under "Data storage", click **Containers**. Click **+ Container**, choose a name for the container, and click **Create**.
3. In the navigation pane, under "Security + networking", click **Shared access signature**.
4. Update the required accessible services and permissions:
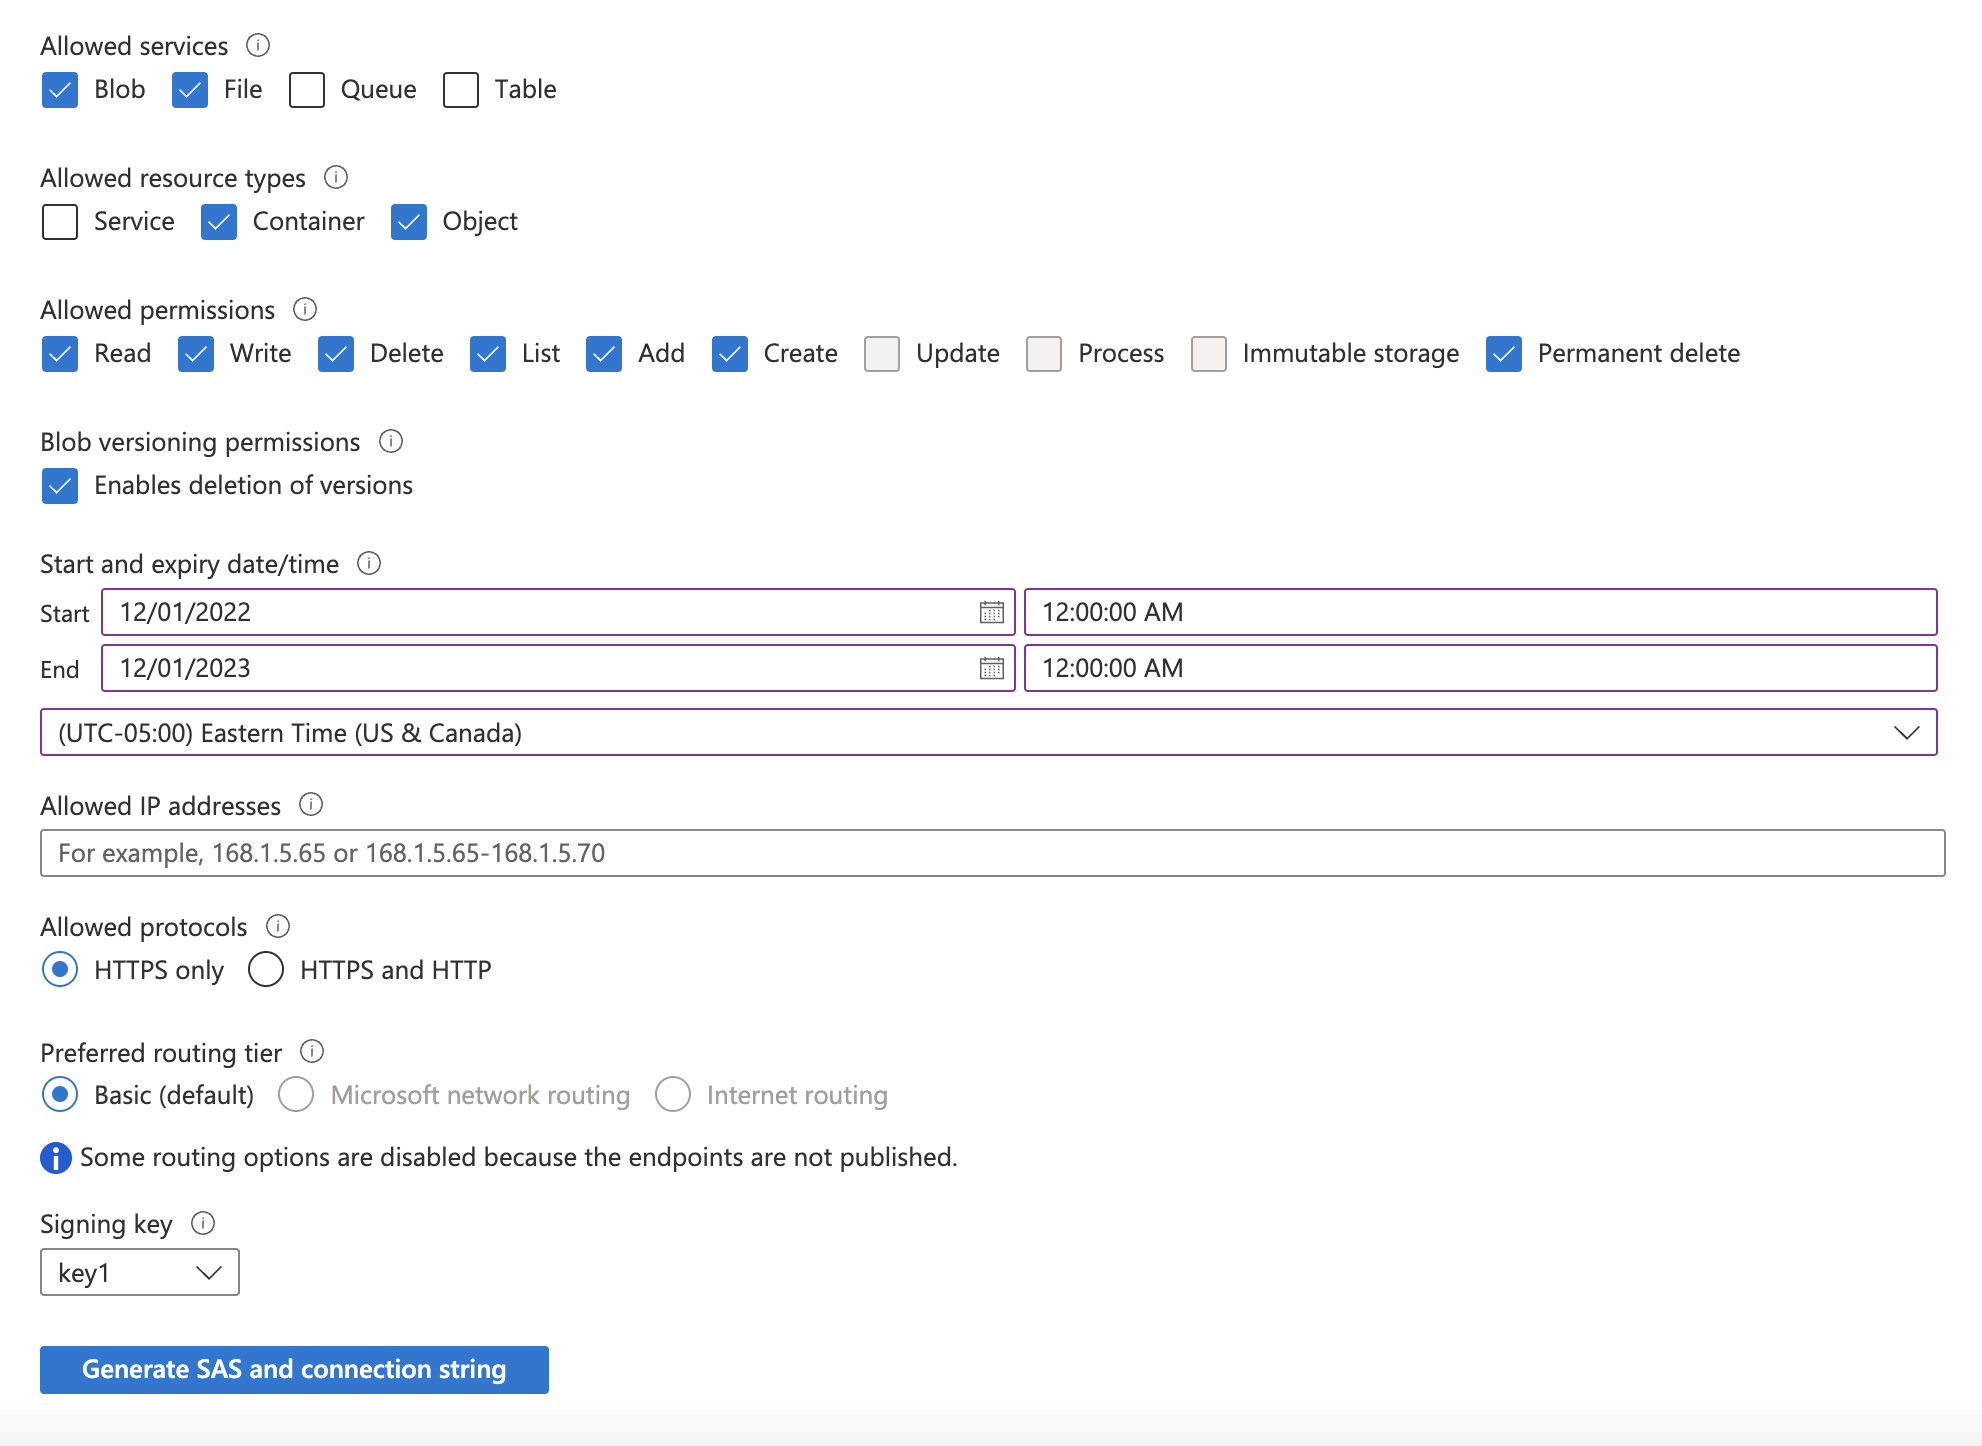
1. Under "Allowed services": select **Blob** and **File**.
2. Under "Allowed resource types": select **Container** and **Object**.
3. Under "Allowed permissions": select **Read**, **Write**, **Delete**, **List**, **Add**, **Create**, and **Permanently Delete**.
5. Select a "Start and expiry date/time" based on your security posture (e.g., set the expiration date 6 months into the future), and click **Generate SAS and connection string**.
6. Make a note of the **SAS token** that is generated.
6. Once the remaining options have been configured to your preference, click **Create**.
## Step 2: Create container and access token
1. In the Azure portal, navigate to the **Storage accounts** service and click on the account that was created in the previous step.
2. In the navigation pane, under "Data storage", click **Containers**. Click **+ Container**, choose a name for the container, and click **Create**.
3. In the navigation pane, under "Security + networking", click **Shared access signature**.
4. Update the required accessible services and permissions:
1. Under "Allowed services": select **Blob** and **File**.
2. Under "Allowed resource types": select **Container** and **Object**.
3. Under "Allowed permissions": select **Read**, **Write**, **Delete**, **List**, **Add**, **Create**, and **Permanently Delete**.
5. Select a "Start and expiry date/time" based on your security posture (e.g., set the expiration date 6 months into the future), and click **Generate SAS and connection string**.
6. Make a note of the **SAS token** that is generated.
 ## Step 3: Add your destination
Securely share your **storage account name**, **container name**, your chosen **folder name** for the data, and your **Storage account SAS token** with us to complete the connection.
## Step 3: Add your destination
Securely share your **storage account name**, **container name**, your chosen **folder name** for the data, and your **Storage account SAS token** with us to complete the connection.