

Prerequisites
- By default, GCS authentication uses role-based access. You will need the data-syncing service’s service account name available to grant access. It should look like
some-name@some-project.iam.gserviceaccount.com.
Step 1: Create a service account
- In the GCP console, navigate to the IAM & Admin menu, click into the Service Accounts tab, and click Create service account at the top of the menu.
- In the first step, name the service account that will be used to transfer data into Cloud Storage and click Create and Continue. Click Continue in the following optional step without assigning any roles.
- In the Grant users access to this service account step, within the Service account users role field, enter the provided Service account (see prerequisite) and click Done.
- Once successfully created, search for the created service account in the service accounts list, click the Service account name to view the details, and make a note of the email (note: this is a different email than the service’s service account).
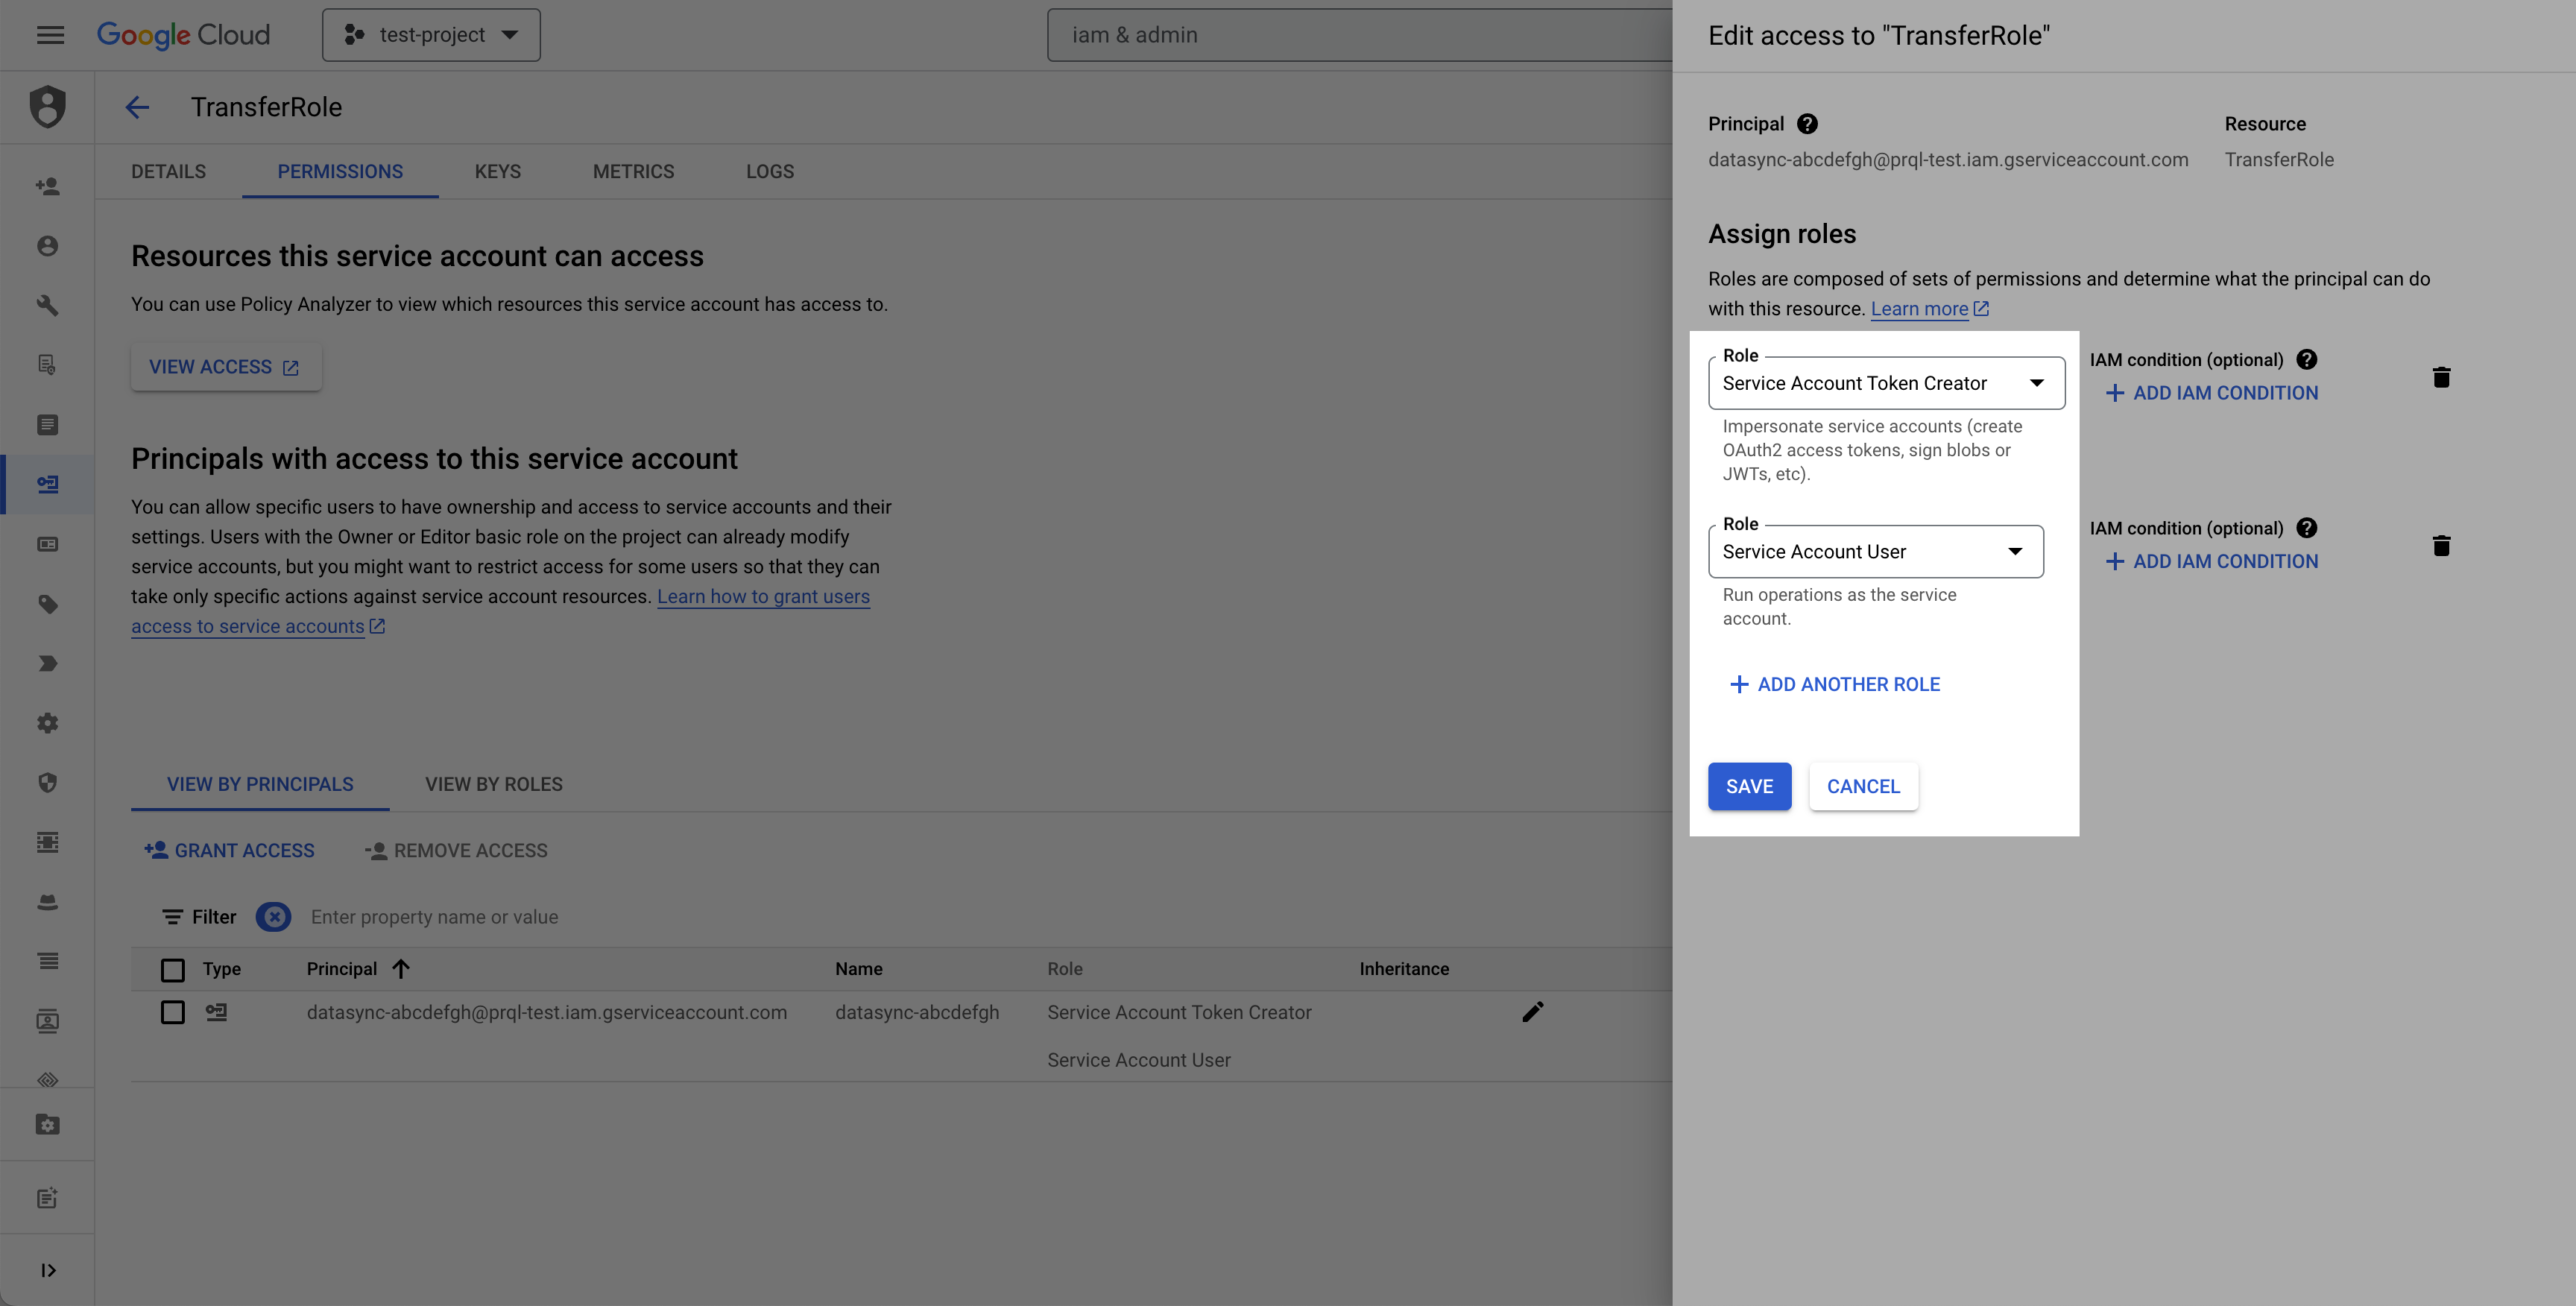
- Select the permissions tab, find the provided principal name (Service account from the prerequisite), click the Edit principal button (pencil icon), click Add another role, select the Service Account Token Creator role, and click Save.
Alternative authentication method: HMAC Access Key & SecretRole based authentication is the preferred authentication mode for Google Cloud Storage based on GCP recommendations, however, HMAC Access Key ID & Secret Access Key is an alternative authentication method that can be used if preferred. An HMAC key is a type of credential and can be associated with a service account or a user account to access Google Cloud Storage.

- Navigate to the Cloud Storage page.
- Click into the Settings tab on the left side menu.
- Navigate to the Interoperability tab and click the Create a key for a Service Account button.
- Select the Service Account created in Step 1, and click Create key.
- Make a note of the Access key and Secret.
Step 2: Create destination GCS bucket
- Navigate to the Cloud Storage page.
- Click Create.
- Enter a bucket name, choose a region. Note: at the Choose how to control access to objects step, we recommend selecting Enforce public access prevention on this bucket.
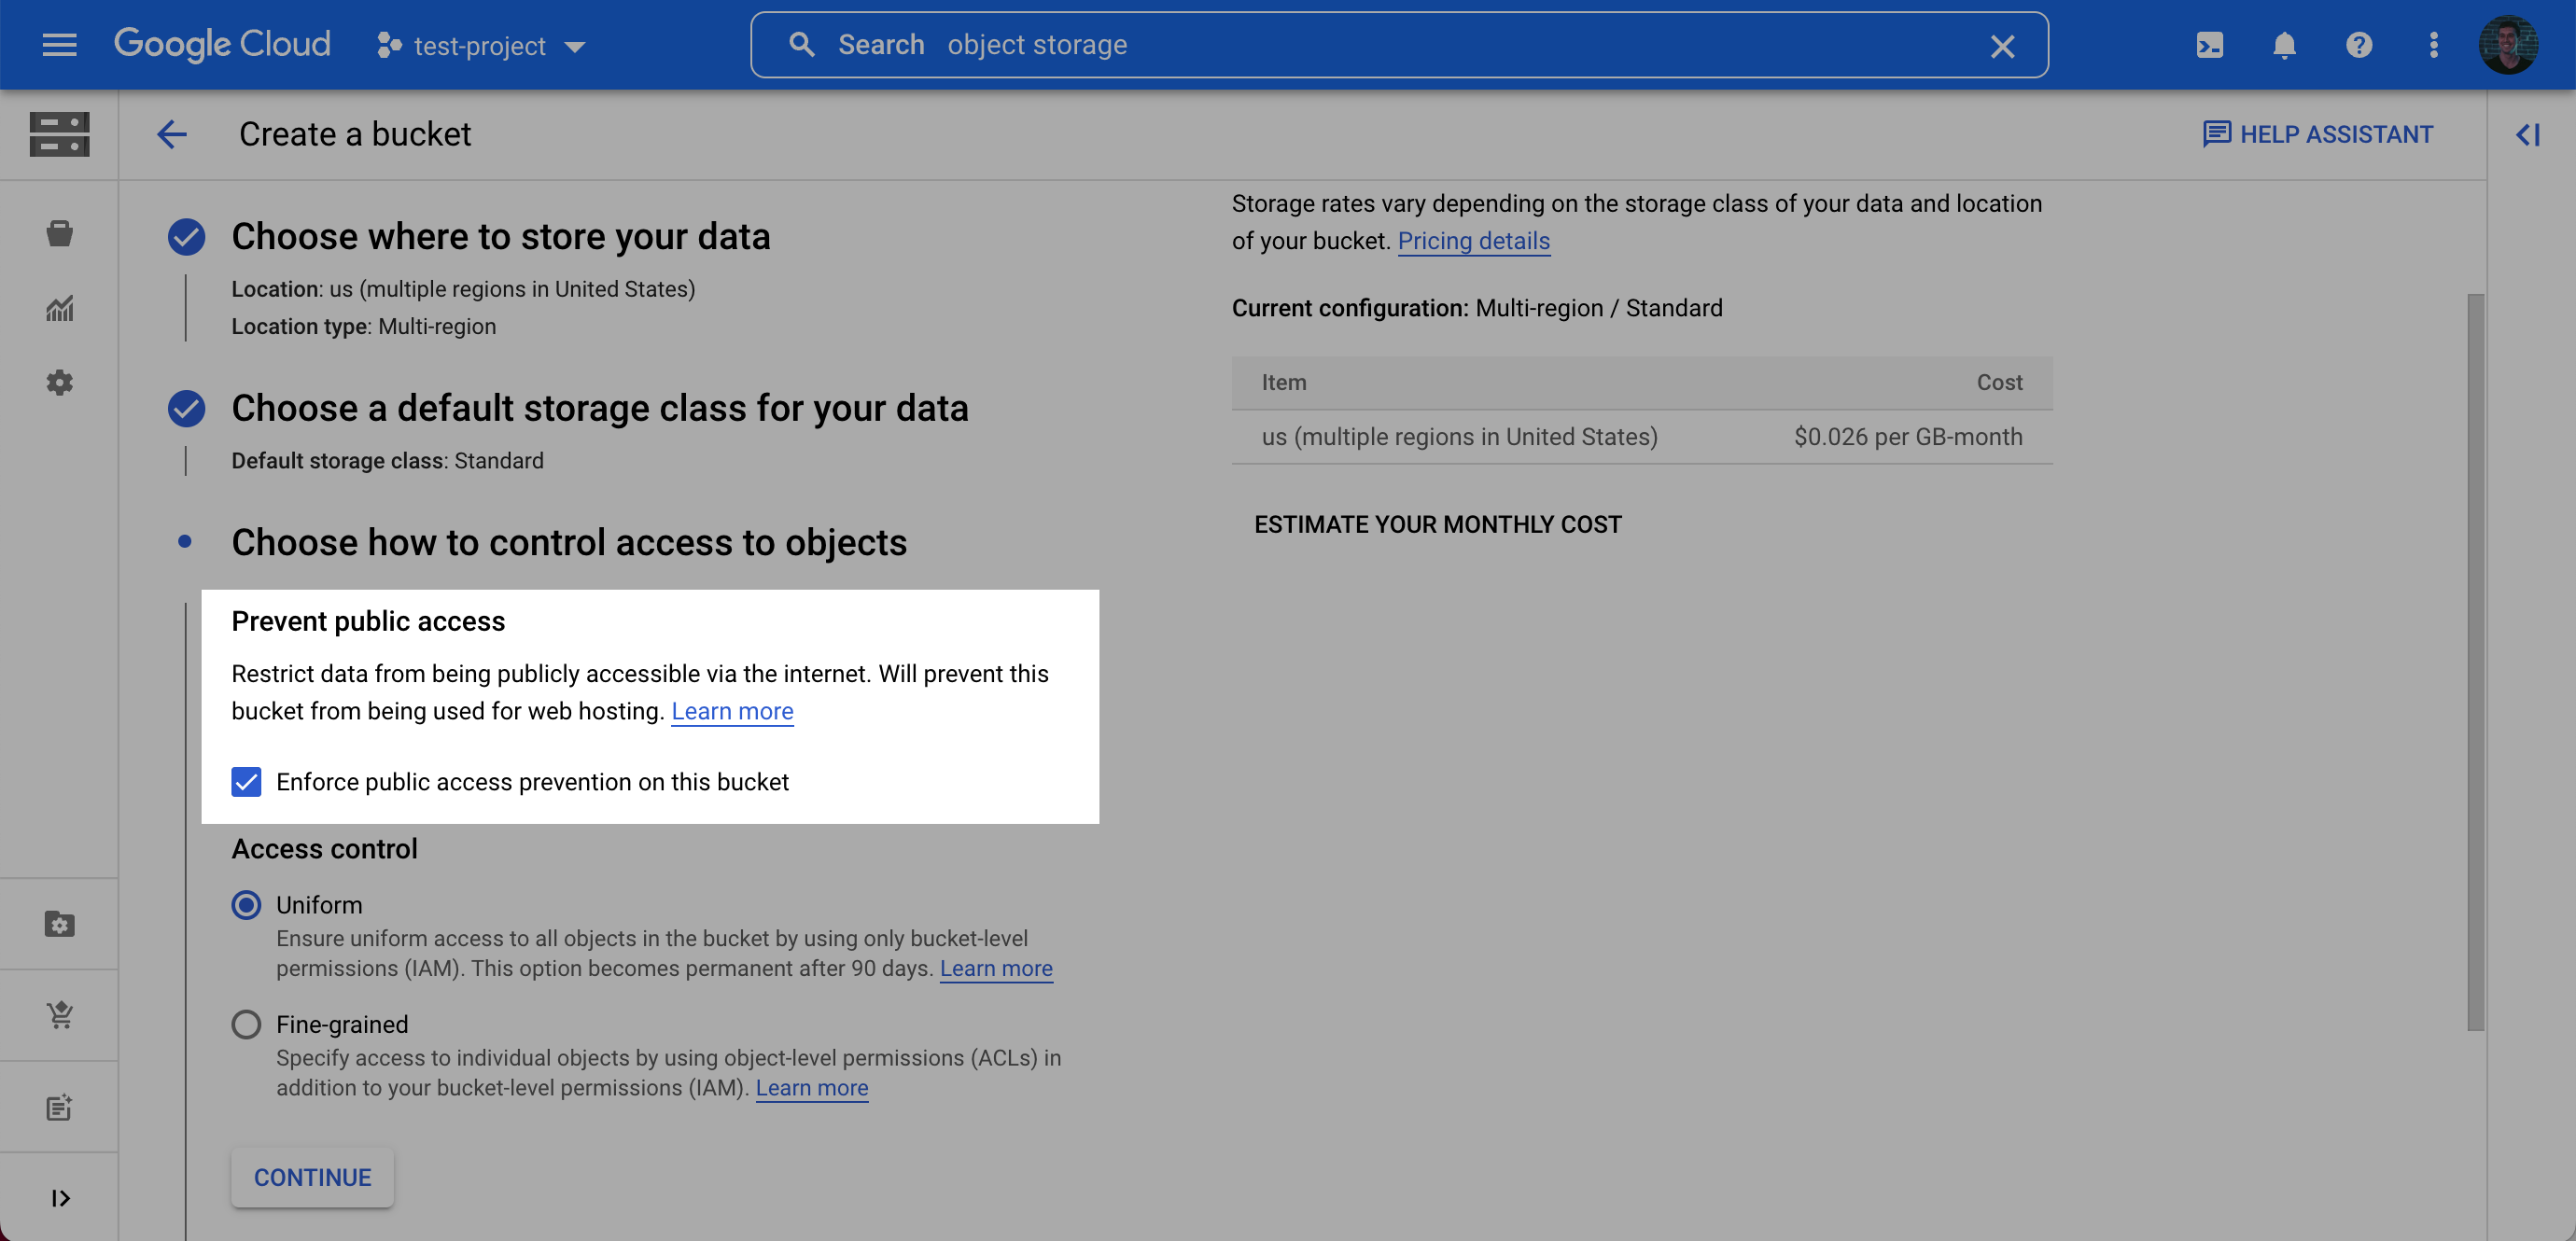
- After choosing your preferences for the remaining steps, click Create.
Use a dedicated bucket for data transfersUsing a unique bucket for these transfers prevents resource contention with other workloads, avoids accidental data loss from mixed lifecycle or cleanup rules, and improves security by reducing surface area and enabling tighter, destination-scoped policies.
- On the Bucket details page for the bucket you created, select the Permissions tab, and click Grant access.
-
Grant access to the principal (Service Account) you created in Step 1 (Note: this is the service account you created, not the service account from the prerequisite), and assign the roles Storage Object User and Storage Legacy Bucket Reader. Click Save.
Alternatively, assign a custom role containing at minimum
storage.buckets.get,storage.objects.create, andstorage.objects.list. Also grantingstorage.objects.gettogether withstorage.objects.deleteenables large files to be uploaded in multiple parallel parts for improved transfer performance; grantingstorage.objects.deletealone lets connection tests clean up their own temporary files.
Step 3: Add your destination
Securely share your bucket name, your chosen folder name for the data, and your Service account email with us to complete the connection.Permissions checklist
- The service account has been granted Storage Object User and Storage Legacy Bucket Reader on the bucket, or an equivalent custom role (see Step 2).
- If using service account impersonation, the Service Account Token Creator role is granted to the impersonating principal.
Temporary file cleanup (optional)By default, a connection test runs against the destination during initial configuration. This test writes temporary artifacts under the prefix
_test_connection/ (at either the bucket root, or inside the custom folder prefix configured on the destination, if present).If you do not grant storage.objects.delete, the connection test still succeeds, but these test files remain in your bucket. To clean them up automatically, configure GCS Object Lifecycle Management on your bucket to delete objects matching the _test_connection/ prefix (or <your_folder>/_test_connection/ if a custom folder was configured) after 1 day, or delete them manually.FAQ
How is the GCS connection secured?
How is the GCS connection secured?
We recommend a service account with role-based access rather than long-lived user credentials. HMAC keys can be used instead when your policy requires it, but short-lived tokens and least-privilege roles are preferred.
Why is service account impersonation required for IAM authentication?
Why is service account impersonation required for IAM authentication?
You create one service account in your project with storage permissions, and we impersonate it with our own service account. This means we never handle your private keys, all operations appear in your audit logs, access is via short-lived tokens, and you can revoke access at any time through your own IAM permissions. Direct service account access is not supported.
How is data organized in the bucket?
How is data organized in the bucket?
Data lands in Hive-style partitions per model:
<folder>/<model_name>/dt=<transfer_date>/<file_part>_<transfer_timestamp>.<ext>. To write to the bucket root, enter . as the folder name.What file formats are supported?
What file formats are supported?
Parquet (default and recommended), CSV, and JSON/JSONL.
How are large datasets written?
How are large datasets written?
Files are automatically split, and multiple files may be written per model per transfer. If
storage.objects.get and storage.objects.delete have been granted, large files are also uploaded in multiple parallel parts and combined in the bucket.How do I know when a transfer completed?
How do I know when a transfer completed?
Each transfer writes a manifest file per model under
_manifests, in the format _manifests/<model_name>/dt=<transfer_date>/manifest_{transfer_id}.json.Why do I sometimes see duplicates?
Why do I sometimes see duplicates?
Object storage is append-only. The change detection process uses a lookback window to ensure no data is missed, which can create duplicates. Downstream pipelines should deduplicate on primary keys, prioritizing the most recent transfer window; manifest files can help bound the set of files to read.
What if I change the bucket or folder?
What if I change the bucket or folder?
New files are appended to the new location, and existing data remains in the old location.
Are there file size limits?
Are there file size limits?
There are no explicit size or row limits for GCS; files are split automatically based on volume and performance heuristics.