

Choosing a cloud provider
Delta Lake destinations are backed by object storage. The data-syncing service supports three cloud providers, each with its own setup steps below:- AWS S3
- Google Cloud Storage
- Azure Blob Storage (with hierarchical namespace / Data Lake Storage Gen2)
Setting up with AWS S3
Prerequisites
- By default, S3 authentication uses role-based access. You will need the trust policy prepopulated with the data-syncing service’s identifier to grant access. It should look similar to the following JSON object with a proper service account identifier:
Step 1: Set up destination S3 bucket
- Navigate to the S3 service page.
- Click Create bucket.
- Enter a Bucket name and modify any of the default settings as desired. Note: Object Ownership can be set to “ACLs disabled” and Block Public Access settings for this bucket can be set to “Block all public access” as recommended by AWS. Make note of the Bucket name and AWS Region.
- Click Create bucket.
Step 2: Create policy and IAM role
- Navigate to the IAM service page.
- Navigate to the Policies tab, and click Create policy.
- Click the JSON tab, and paste the following policy, being sure to replace
BUCKET_NAMEwith the name of the bucket chosen in Step 1. Unlike an append-only object storage destination, Delta Lake requires read and list access in addition to write and delete, since the writer must read existing table metadata to perform transactional commits.
KMS-encrypted bucketsIf the destination bucket uses KMS encryption, also grant
kms:GenerateDataKey and kms:Decrypt on your key’s ARN. SSE-C encryption is not currently supported.- Click Next: Tags, click Next: Review.
- Name the policy, add a description, and click Create policy.
- Navigate to the IAM service page, then the Roles tab, and click Create role.
- Select Custom trust policy and paste the provided trust policy to allow AssumeRole access to the new role. Click Next.
- Add the permissions policy created above, and click Next.
- Enter a Role name, for example
transfer-role, and click Create role. - Once successfully created, search for the created role in the Roles list, click the role name, and make a note of the ARN value.
Step 3: Add your destination
Securely share your bucket name, bucket region, and role ARN with us to complete the connection.Setting up with Google Cloud Storage
Prerequisites
- By default, GCS authentication uses role-based access via service account impersonation. You will need the data-syncing service’s service account name available to grant access. It should look like
some-name@some-project.iam.gserviceaccount.com.
Step 1: Create a service account
- In the GCP console, navigate to the IAM & Admin menu, click into the Service Accounts tab, and click Create service account at the top of the menu.
- In the first step, name the service account that will be used to transfer data into Cloud Storage and click Create and Continue. Click Continue in the following optional step without assigning any roles.
- In the Grant users access to this service account step, within the Service account users role field, enter the provided Service account (see prerequisite) and click Done.
- Once successfully created, search for the created service account in the service accounts list, click the Service account name to view the details, and make a note of the email (note: this is a different email than the service’s service account).
- Select the permissions tab, find the provided principal name (Service account from the prerequisite), click the Edit principal button (pencil icon), click Add another role, select the Service Account Token Creator role, and click Save.
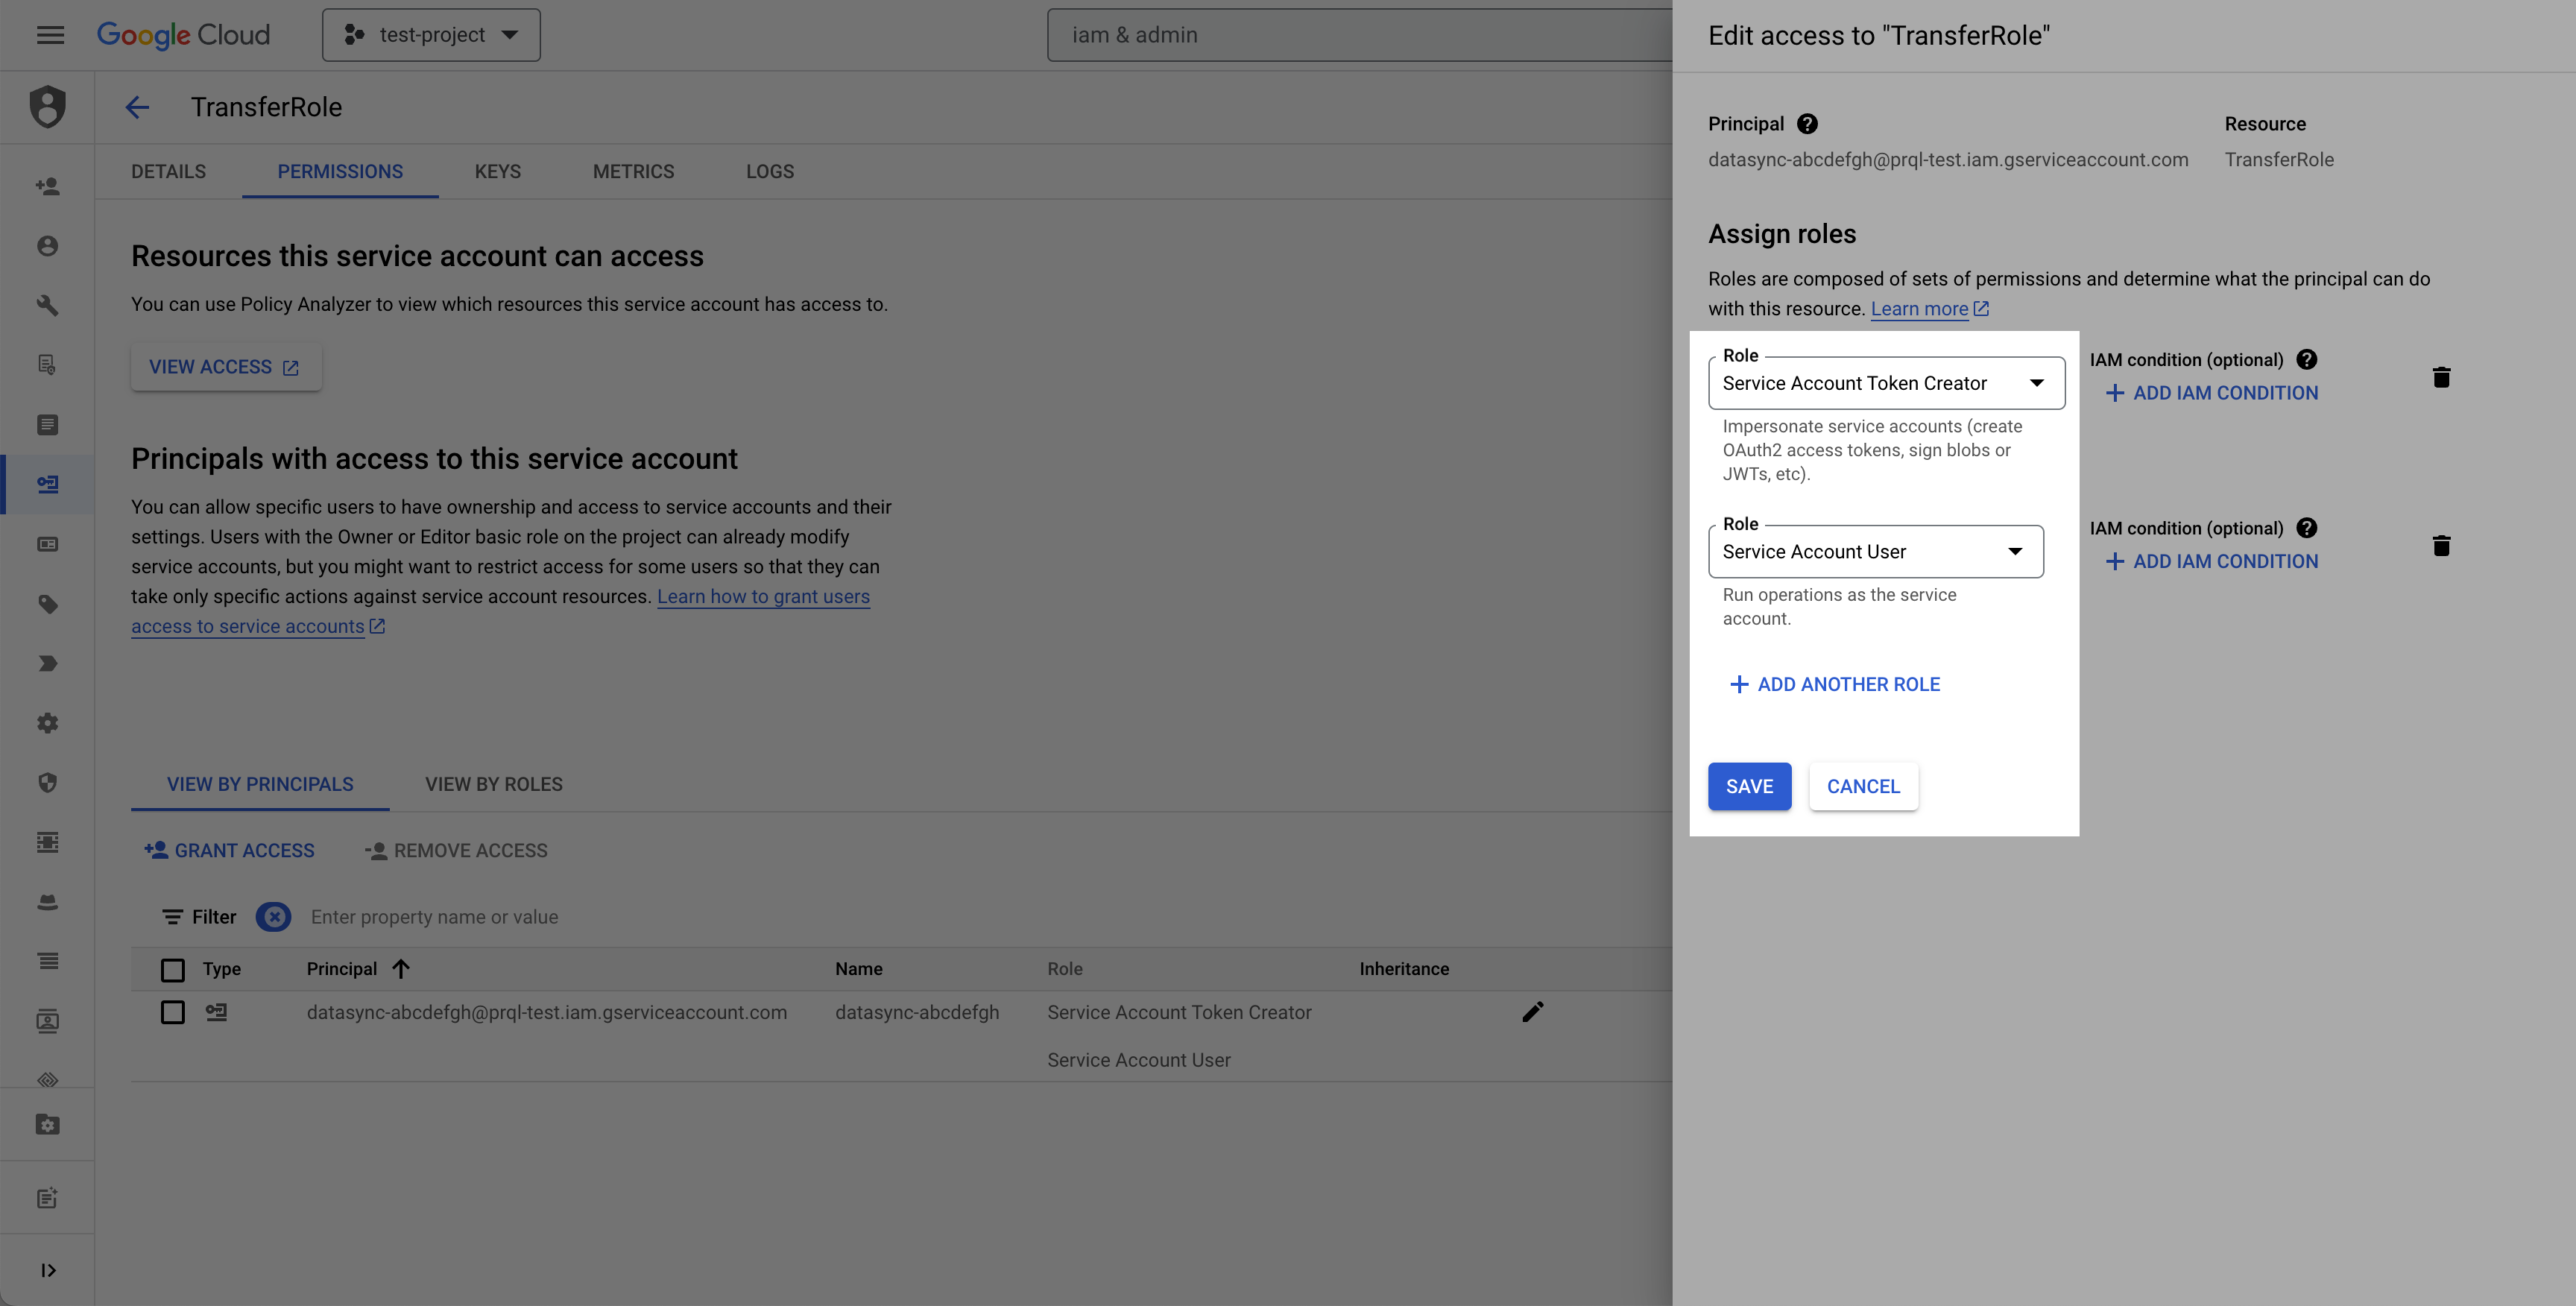
Step 2: Create destination GCS bucket
- Navigate to the Cloud Storage page.
- Click Create.
- Enter a bucket name, choose a region. Note: at the Choose how to control access to objects step, we recommend selecting Enforce public access prevention on this bucket.
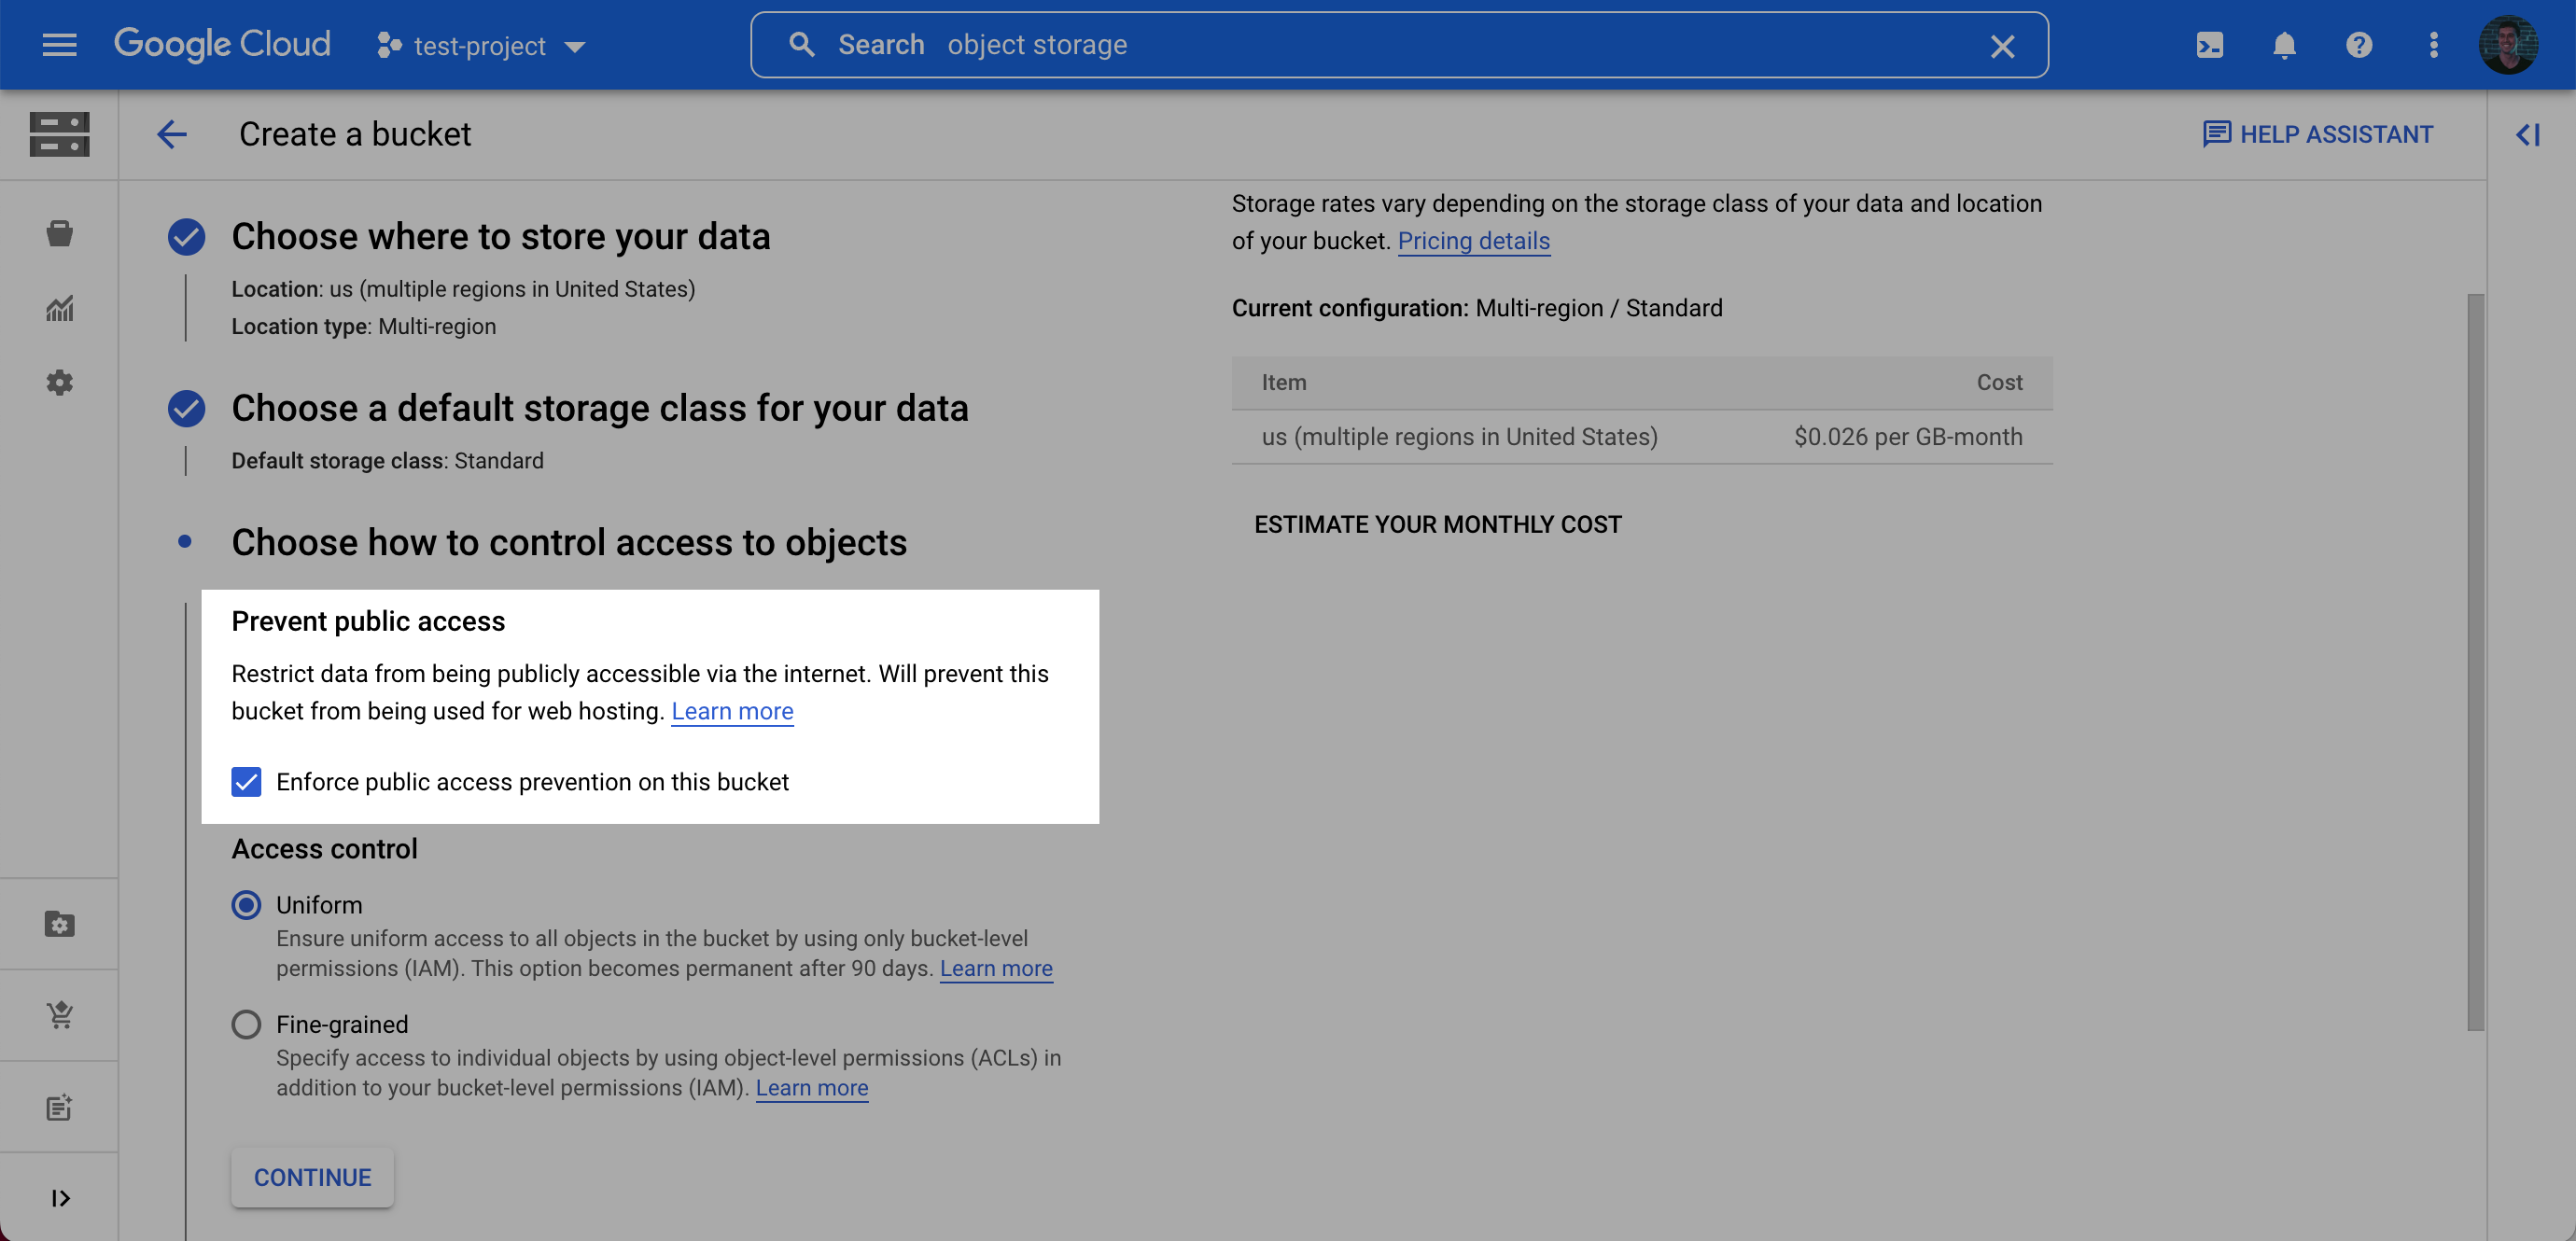
- After choosing your preferences for the remaining steps, click Create.
Use a dedicated bucket for data transfersUsing a unique bucket for these transfers prevents resource contention with other workloads, avoids accidental data loss from mixed lifecycle or cleanup rules, and improves security by reducing surface area and enabling tighter, destination-scoped policies.
- On the Bucket details page for the bucket you created, select the Permissions tab, and click Grant access.
-
Grant access to the principal (Service Account) you created in Step 1 (this is the service account you created, not the service account from the prerequisite), and assign the roles Storage Object User and Storage Legacy Bucket Reader. Click Save.
Alternatively, assign a custom role containing at minimum
storage.buckets.get,storage.objects.create,storage.objects.get,storage.objects.list, andstorage.objects.delete.
Step 3: Add your destination
Securely share your bucket name, your chosen folder name for the data, and your Service account email with us to complete the connection.Setting up with Azure Blob Storage
Delta Lake on Azure requires a storage account with hierarchical namespace enabled (Azure Data Lake Storage Gen2).Step 1: Create Azure storage account
- In the Azure portal, navigate to the Storage accounts service and click + Create.
- In the “Basics” tab of the “Create a storage account” form, fill in the required details.
- In the “Advanced” settings, under “Security” make sure Enable storage account key access is turned on. You may turn off (deselect) “Allow enabling public access on containers”. Under “Data Lake Storage Gen2”, select Enable hierarchical namespace.
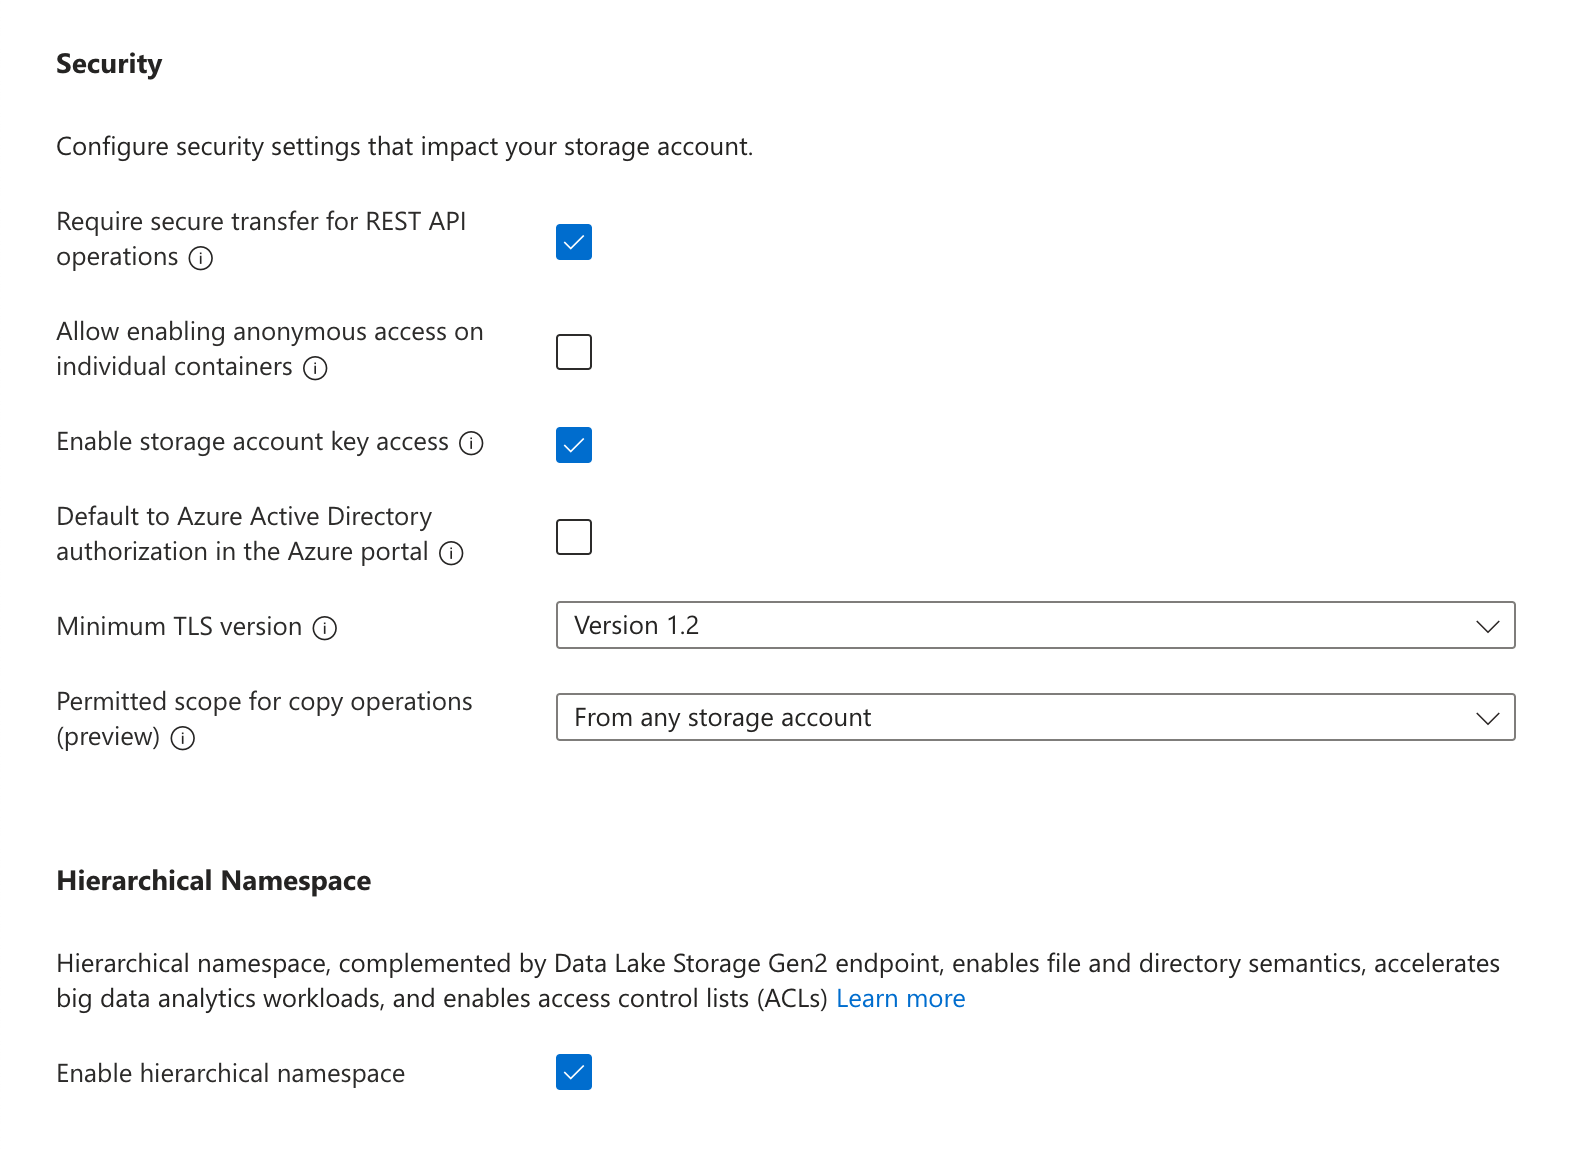
- In the “Networking” settings, you may limit “Network access” to either Enable public access from all networks or Enable public access from selected virtual networks and IP addresses. If the latter is selected, be sure to add the service’s static IP to the address range of the chosen virtual network.
Network allowlistingCloud-hosted (US):
35.192.85.117/32Cloud-hosted (EU): 104.199.49.149/32If private-cloud or self-hosted, contact your Thanx representative for the static egress IP.- In the “Data protection” settings, you must turn off Enable soft delete for blobs, Enable soft delete for containers, and Enable soft delete for file shares.
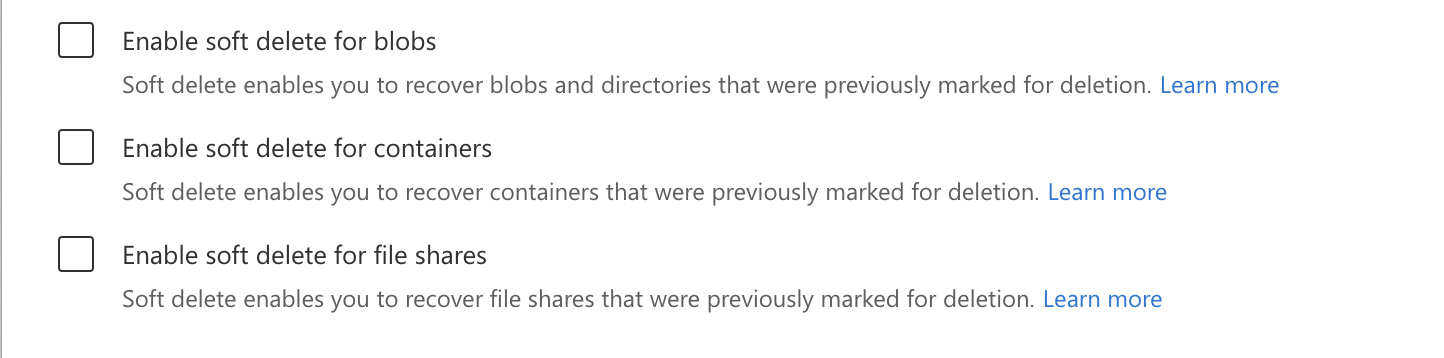
- Once the remaining options have been configured to your preference, click Create.
Step 2: Create container and access key
- In the Azure portal, navigate to the Storage accounts service and click on the account that was created in the previous step.
- In the navigation pane, under “Data storage”, click Containers. Click + Container, choose a name for the container, and click Create.
- In the navigation pane, under “Security + networking”, click Access keys, and make a note of the generated key under either key1 or key2.
No role-based alternative for AzureUnlike the AWS and Google Cloud setups above, Delta Lake on Azure is configured with a storage account access key rather than a managed identity or role-based option.
Step 3: Add your destination
Securely share your storage account name, container name, your chosen folder name for the data, and your access key with us to complete the connection.Understanding Delta Lake configuration options
retention_window_days
Sets the number of days for which historical data (previous table versions used for time travel or auditing) is retained. Set this value according to your organization’s internal data retention policies.
column_mapping_mode
Controls how columns are mapped between the underlying storage and the table schema. This setting is critical during schema evolution. Use ID for robust mapping, unless supporting lower protocol versions requires otherwise.
deletion_vectors_disabled
Determines whether deletion vectors are used. Deletion vectors enable merge-on-read (marking deletions without rewriting files); disabling them uses copy-on-write (rewriting entire files). We recommend enabling deletion vectors for performance, unless you need lower protocol compatibility.
change_data_feed_disabled
Controls whether the change data feed (CDF) is active. The CDF records row-level changes (inserts, updates, and deletes) for incremental processing, auditing, or real-time analytics. Keep this enabled by default, unless supporting lower protocol versions requires otherwise.
Reader compatibility
Different downstream systems have specific protocol requirements for reading Delta Lake tables:FAQ
What is Delta Lake and why should I use it?
What is Delta Lake and why should I use it?
Delta Lake delivers warehouse-native capabilities such as upserts, time travel, and schema evolution, with the simplicity, scalability, and secure permissions model of an object storage bucket.
Why do you need permissions to delete data?
Why do you need permissions to delete data?
Delta Lake uses vacuum operations to clean up obsolete data files and maintain transaction isolation. The writer must have delete permissions so that vacuuming can safely remove outdated files without compromising the consistency and isolation of ongoing transactions.
Can I send the data to a specific prefix in a bucket?
Can I send the data to a specific prefix in a bucket?
Yes, but we recommend using a completely isolated bucket instead. The Delta Lake destination requires permission to list objects across the entire bucket, so access cannot be scoped to a specific prefix.
Do I need to perform maintenance operations on the Delta Lake table?
Do I need to perform maintenance operations on the Delta Lake table?
No, the data writer is responsible for vacuuming and compacting data as needed. Data consumers should not run any non-read queries on the table.
How do I know when a table has been updated?
How do I know when a table has been updated?
You can query table history with
DESCRIBE HISTORY table_name LIMIT 1;. Most bucket providers also support webhooks or Lambda triggers on file creation in the _delta_log directory.What is the difference between merge-on-read and copy-on-write in Delta Lake?
What is the difference between merge-on-read and copy-on-write in Delta Lake?
Merge-on-read uses deletion vectors to mark rows without rewriting files, which speeds up incremental updates. Copy-on-write rewrites entire Parquet files on modification, which is less efficient for frequent changes.